
Here's Clementine pre-rebuilding. Not too much will change on the exterior during the rebuild, other than the DVD burner (at top) being removed, because it is an IDE drive, and the new motherboard (like most new motherboards) only supports SATA. But that's fine, because Clementine also has a newer LG Blu-Ray burner which is SATA, and I've never needed to use both. Otherwise, there's a front card reader which is the result of a recent upgrade, which will also be staying.

A view inside the old Clementine. She has an AMD Athlon X2 4600 CPU, 2 optical drives, 2 hard drives, an Antec 550W power supply, a new-ish nVidia video card, a Firewire port expansion card, a Linksys wireless card (since she's upstairs and the router is downstairs!) and a super-quiet case fan.

A better view of the optical and hard drives. Like I said, the top DVD burnder is an IDE drive, so will be retired as part of this upgrade. Below it is the SATA Blu-Ray burner. And below that are the two SATA hard drives. One 500GB drive, which holds the data, and one 750GB drive which is split into two partitions -- a 250GB partition for OS and applications, and a 500GB partition which serves as the destination for the nightly backup of the data drive.

I love (LOVE) my Antec power supply, but it sure does have a lot of cables, so I needed to remove it in order to get a better sense of things in the case. Also disconnected SATA cables from drives. Now it's less cluttered and easier to maneuver in.
DVD burner removed. Farewell, old friend. That drive dates back to 2005 (older than Clementine!) and was amongst the oldest components still in use.
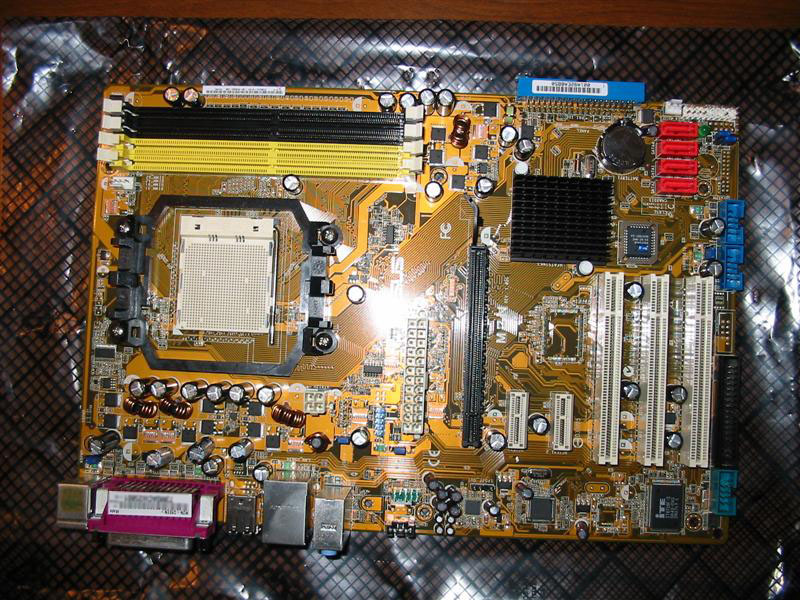
New mothboard, with new CPU sitting next to it. I am really excited about the new CPU. It's an Intel Core i7 -- their high-end of consumer processors. This is my first build with an Intel CPU. I've never been religious about CPUs, but each previous build it's just seemed like AMD provided more power at the pricepoint I wanted to pay. The tide has turned and for this build, Intel was the best choice. The motherboard is an ASRock, which is also a new brand for my builds. I previously have been exclusively an Asus motherboard user, but had a couple issues recently (a manual that incorrectly stated the allowable speed of memory and a dead USB connector) which didn't completely turn me off from Asus, but encouraged me to open the field and consider other brands in addition to Asus. This time around, ASRock seemed like the best buy.

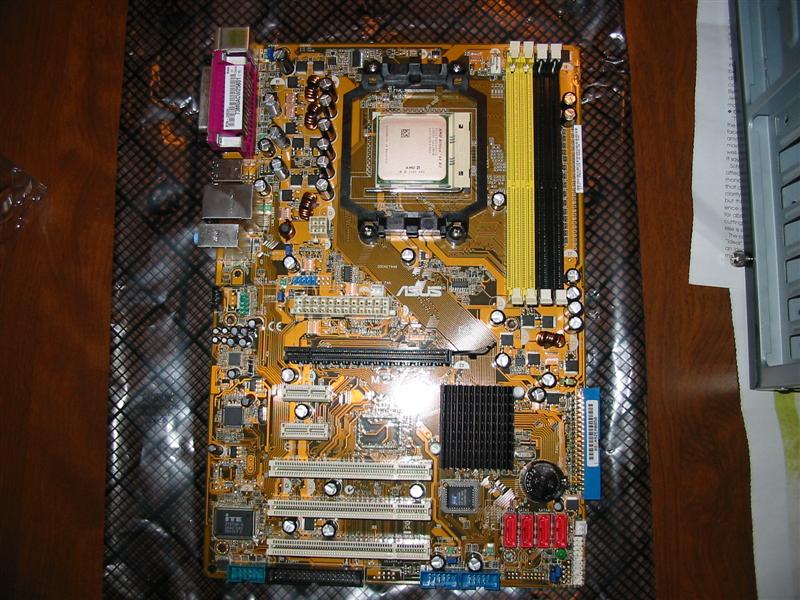
The CPU installed in its socket. This process gets less scary the more you've done it, but I'm always nervous about bending a pin while doing it.
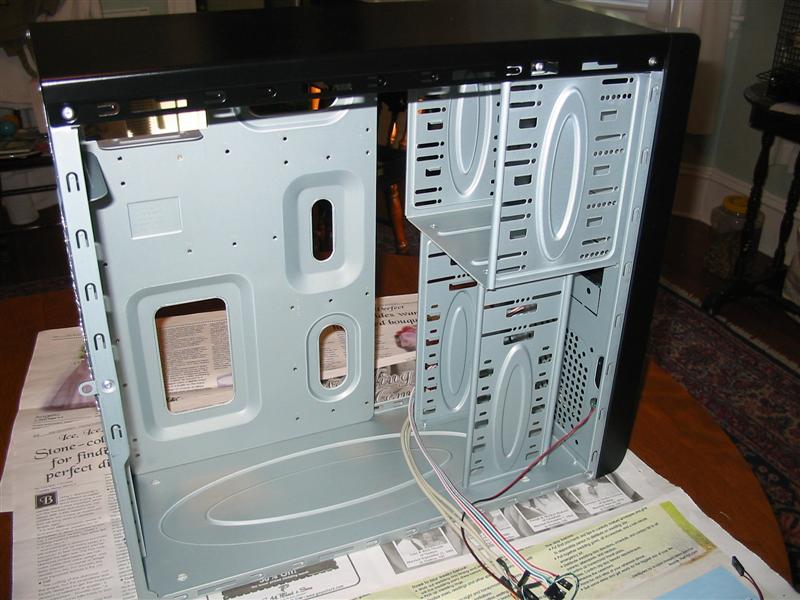
My original plan was to just remove the power supply & motherboard, and keep everything else in place during this upgrade. However, at this point I realized that the new motherboard is wider than the old one, so it'll be much easier if I just take everything out. So here's the case with only the Blu-Ray burnder, case fan, and front card reader installed. It looks so empty, and brings back memories of when I originally built it!

View of the mothboard, now installed in the case. Starting to take form and look like a computer again!

Now with the stock Intel CPU cooler in place. But keep reading, because it doesn't stay there long.

Clementine now with the minimum amount of hardware needed to boot -- motherboard, CPU, CPU cooler, power supply, video card, and memory. At this point, the computer should turn on and boot into BIOS. I'll also just point out the memory, as it's another new part -- I got twin 4GB PC1600 modules, for a total of 8GB of memory, a decent amount by today's standards. And since I got twin modules, I can take advantage of the motherboard's dual-channel functionality, which effectively speeds up the read/write time of the RAM even more.
And at this point, I powered Clementine on for the first time, and things did not go as smoothly as I would have hoped. She did indeed boot into BIOS, but the fan on the CPU cooler did not spin. This is a dangerous situation -- modern CPUs can get extremley hot in just 10 - 20 seconds without cooling, and can potentially be damaged. Through much troubleshooting, including connecting the CPU cooler from Clementine's old motherboard to this motherboard (but not on the CPU, since they're not compatible) I determined that the CPU fan itself was defective.
So, I was left with a few options. I could make use of Intel's warranty service, but that could take weeks to resolve, and would require removing the CPU (since they came together). Similarly, I could return it to NewEgg for a replacement, but that also would require uninstalling the perfectly-fine CPU, paying return shipping, and waiting up to a week. Or I could just order a new aftermarket cooler from NewEgg, but that still would be a few more days (since I discovered this on a Friday evening).
What I ended up deciding was that the CPU cooler is such a (relatively) inexpensive part of the CPU package, that it would be silly to send the whole thing back just for a new cooler, and especially if it meant waiting weeks to have a working computer. So I found a local store (Micro Center) that sells computer parts (and loved it -- it's like NewEgg in store form... huge!) and bought an aftermarket cooler on Saturday. Since I'm not overclocking, I don't need an incredibly high-end one, I just need one that's about as good as a stock cooler (which typcially aren't great).

...So after much consideration, I bought this Xigmatek Apache II CPU cooler. It wasn't terribly expensive, and isn't terribly huge (although it is slightly larger than the stock cooler), but it works about as well as a stock cooler and gets the job done. And it spins up, which is better than the stock cooler I had, anyway! So, now we can move on with the process, delayed by just one day! It's worth mentioning that this was the first time I have ever installed an aftermarket CPU cooler, so I had to learn all about the art of applying thermal paste (stock coolers come with paste already applied). Scary and interesting, and now one more skill in my toolbox. Note that I also installed one hard drive (the OS/application one).

So now Windows 7 can be installed!

Here's the final configuration inside the computer. Second memory module has been added (although you can't really see it with all the power supply cables), second hard drive, wireless card, Firewire card, and all front ports have been connected.

A closer look at the drives, because it wasn't terribly easy getting them installed. Since the new motherboard is larger than the old one, and this case is just slightly on the small side, things got a little cramped. Some spots where drives could go would have cause important ports on the motherboard to get blocked, so I had to give some careful thought to drive placement. Luckily, this case has lots of options for drive mountings, and I had some spare hard drive brackets (which allow you to mount a hard drive in a spot meant for an optical drive), so I was able to shift things around and make it work fine.
When all was said and done, Clementine went "live" (by which I mean, she was at the point where we could use her as our primary computer again) on Sunday, January 29th. The excruciatingly-planned re-build for Clementine is complete. It wasn't without its challenges, but everything works great in the end and Clementine is well-equipped for another 5 years of being our primary computer.
| Component | Original Clementine (May 2007) | Old Clementine (January 2012) | New Clementine |
| CPU | AMD Athlon 64 X2 4600+ 2.4GHz | AMD Athlon 64 X2 4600+ 2.4GHz | Intel Core i7-2600 3.4GHz |
| Motherboard | Asus M2N (USB 2, IDE, SATA, max 8GB DDR2 800 RAM) | Asus M2N (USB 2, IDE, SATA, max 8GB DDR2 800 RAM) | ASRock P67 Pro3 (USB3, SATA, max 32GB DDR3 1600 RAM) |
| Case | Ark A601-1 Black/Silver Steel Mid Tower Case | Ark A601-1 Black/Silver Steel Mid Tower Case | Ark A601-1 Black/Silver Steel Mid Tower Case |
| Case Fan | Enermax UC-8EB 80mm | Enermax UC-8EB 80mm | Enermax UC-8EB 80mm |
| Power Supply | Antec TruePower Trio 550W | Antec TruePower Trio 550W | Antec TruePower Trio 550W |
| Operating system | Windows XP | Windows Vista | Windows 7 |
| Memory | 1GB DDR2 667 Kingston | 2GB DDR2 667 Kingston | 8GB DDR3 1600 Kingston |
| Video card | EVGA GeForce 7100GS | EVGA GeForce 210 | EVGA GeForce 210 |
| Primary hard drive | Seagate SV35 160GB | Western Digital Caviar Black 750GB | Western Digital Caviar Black 750GB |
| Secondary hard drive | Seagate Barracuda 7200.10 80GB SATA | Western Digital Caviar Blue 500GB | Western Digital Caviar Blue 500GB |
| DVD-ROM / Bluray Burner | Compaq DVD-117MG | LG 10x Blu-ray Burner | LG 10x Blu-ray Burner |
| DVD-RW | Plextor PX-740A | Plextor PX-740A | None |
| Keyboard | Logitech LX710 Cordless Keyboard | Logitech LX710 Cordless Keyboard | Logitech LX710 Cordless Keyboard |
| Mouse | Logitech LX7 Cordless Laser Mouse | Logitech LX7 Cordless Laser Mouse | Logitech LX7 Cordless Laser Mouse |
| Monitor #1 | Samsung 15" LCD | Samsung 19' LCD | Samsung 19' LCD |
| Monitor #2 | None | Samsung 19' LCD | Samsung 19' LCD |
| Speakers | Altec Lansing ACS33 | Altec Lansing FX4021 | Altec Lansing FX4021 |
| WebCam | Logitech STX Communicate | Logitech STX Communicate | Logitech STX Communicate |
| Wireless NIC | Linksys WMP54G | Linksys WMP54G | Linksys WMP54G |
| Headset | None | Plantronics MX-505 | Plantronics MX-505 |
| UPS Power supply | None | APC Back-UPS ES BE750G | APC Back-UPS ES BE750G |
| Firewire Expansion Card | None | Rosewill 2+1 Port Firewire PCI Card | Rosewill 2+1 Port Firewire PCI Card |
| Card Reader | None | Koutech All-in-one Front Panel Card Reader | Koutech All-in-one Front Panel Card Reader |